

Search this page
SAFARI
Command + F
CHROME
Mac Command + F
Windows Control + F
User Manual
Lost Guitar
Hello and a huge thank you for purchasing Lost Guitar.
Your support is helping other creatives and families make a living through music, so we really appreciate it.
This user manual should give you all the information you need to learn about the instrument and get the best out of the controls.
Helpful tips
Downloading
Refer to this page for help on downloading
https://westwoodinstruments.com/howtodownload/
–
Built-in manual
Because no one actually reads manuals (except you, you little rebel), there is a built-in manual available on the interface.
1. Ensure you have the Kontakt INFO panel open.
2. Hover over any control in the interface and a short helpful description will appear in the Info panel at the bottom.
–
Reset a fader or knob position to default
Reset any fader or knob to its default position:
MAC Command + Left click
WINDOWS Windows + Left click
Please note, this does not work on switches.
–
Fine Tuning
If you hold down Shift whilst turning any knob on the interface, you can achieve a much more precise and granular level of control. This tip work with most Kontakt instruments 🙂
—
Using an external MIDI controller unit
To connect a fader or knob on the interface to an external hardware unit:
1. Right click the fader or knob on the interface
2. Select “Learn MIDI CC# Automation”
3. Move the control on the external hardware unit
Presets / Snapshots
Included with the library are over 300 presets (known as Snapshots in Kontakt). These have been created to get you into some good starting points, show you what’s possible, and demonstrate some more unusual ideas.
Selecting a snapshot
1. Click the Snapshot switch in the Kontakt menu (camera icon)
2. Select the first loaded snapshot to show the menu of all Snapshots
3. You can also use the arrow keys to scroll through all of the Snapshots
Saving your own snapshots
You can save your own Snapshots to use again in other projects and compositions.
1. Click the Snapshot switch (camera icon)
2. Click the Save switch (disk icon)
Navigation

Use these four menu icons to access different parts of the interface.
SOUNDS
Chose sounds, do some basic editing and access the MOTION and MOOD controls
PROCESS
Add various built-in effects.
MEMORIES
Create a rhythmical underscore here.
PLACES
Ambience, noises, reverb and delay.
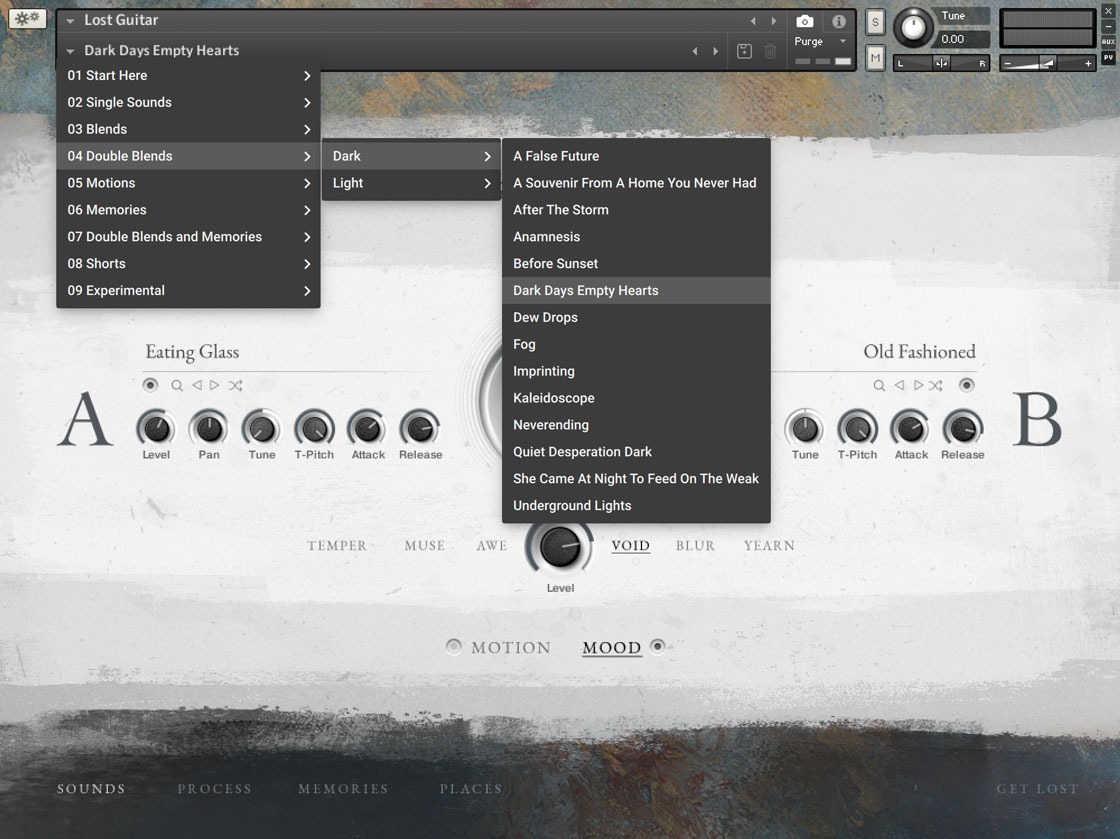
Choosing sounds

This sound selector page will appear once you have clicked the search icon or name on either side.
Previewing sounds
Click on any of the sound icons to hear a preview of that sound. You can turn off the preview with the power switch next to the word Preview. You can adjust the playback volume of the preview with the Volume knob at the bottom.
Loading sounds
Once you have clicked a sound icon, press LOAD and the sound will be loaded into the instrument.
Cancel
If you want to get back to the main screen without loading a sound, just click CANCEL. No hard feelings.
A/ B
To choose a sound for the other side instead of the one you’re on, just click the other letter.
SOUND TYPES
The sounds are split into 4 categories. NOTES, MOVEMENTS, TEXTURES and RHYTHMS.
NOTES
Sustained guitar sounds. These decay in the same way a guitar does.
MOVEMENTS
Random and unmeasured. These looped sounds are great for creating an interesting bed of sound.
TEXTURES
Looped synth-inspired pads.
RHYTHMS
Humanly-played simple looped rhythms. They have all been recored at 120bpm but will beat sync to your DAW’s tempo.
SHRT
The word SHRT is short of the letter O. We thought it was clever at the time, but now realise you probably just think we’ve made a typo. These sounds have been created to be super short. They’re perfect for the Memories engine or for other rapid arpeggiated patterns. Any sound can be made short using its ADSR controls, but these have been designed that way. Don’t go expecting to make any long pads with these! Ironic that the short sounds has had the longest description.
MOTION & MOOD

MOTION
This control oscillates the Blend between both sides. You can either create a deep and pulsating synth-like wobble, or use it much more subtly to slowly move back and forth between the sounds. The centre of the motion will be wherever you have the BLEND knob positioned.
Wave Type
Change the wave type. Choose between Sine, Sawtooth, Square and Random.
Depth
Changes the Depth of the motion
Speed
Changes the speed of the motion
SPEED – SYNC/FREE
In SYNC mode, the motion will synchronise with the tempo in your DAW e.g. 120bpm
In FREE mode, the motion will be set in milliseconds.
MOTION – LOCK/FREE
In LOCK mode, whatever you play follow the oscillator set by the first note you play. All notes will be oscillating at the same rate and time.
In FREE mode, each note will start a new oscillation. With this setting you can create some very dynamic and chaotic sounds by playing broken/rolled chords.
—
MOOD
This sets up a ready-to-go chain of plugins built into the instrument. All of the effects on the Process page and also the Reverb and Delay effect on the Places page are changed.
On some of the MOOD presets, the effect isn’t pronounced until the knob is set to around 50% or higher.
MEMORIES

What are MEMORIES?
The Memories engine is a sophisticated arpeggiator and delay engine, which accompanies your main sound. It’s perfect for creating a very interesting and unique underscore to a chord sequence or long pad to create movement and something interesting.
It’s not designed for fast lead lines, so make sure you save it for the chords and pads.
PRESETS
To get you an immediate start, there are some built in presets just for the Memories engine.
These set all of the controls as well as choosing a sound which works nicely with those settings. You can then make your own adjustments from there.
PATTERNS
Clicking on the Patterns menu, brings up some options for the velocity based patterns behind the engine.
These will have some effect so experiment, but the greatest change in sound will come from choosing different sound sources and changing the main controls on the interface.
SOUND SELECTOR
You can choose the sound source for the Memories here. The icons function the same as they do on the Sounds page.
Please note: Whilst all the sounds are available to the Memories engine, some will be a lot more suitable than others. We find the more percussive sounds with a clear attack sound better, but please experiment!
Power
To turn on / off the Memories engine, please click the Power button.
—
BLEND
Mix between the main sounds and the Memories using the Blend knob. Just as the blend knob works for sides A and B, turning the knob fully either way will effectively mute the other sounds.
Attack / Decay
Change the Attack and Decay times of the Memory sounds.
—
DAMPENING
Dampening provides a nice way to introduce some variation to the Memories.
Damp
This reduces the higher frequencies in the sound. At minimum there is no effect on the original recordings of the sound. At maximum only the very lowest frequencies will be heard.
Variation
Increasing this control allows more and more of an un-dampened sound through on random notes. Set to minimum, all Memory sounds will play with the same amount of Dampening.
DENSITY
This changes the amount of notes played by the Memories engine.
Rate & Sync / Free
Set to ‘Sync’ to tempo sync the notes with your DAW’s tempo, then change the Rate knob to set how frequently the notes are played.
You can set to ‘Free’ sync and dial in a time value if you want something a bit more jarring.
Upper Oct (0, +1, +2)
Set how many octaves above the notes you are currently playing will be trigged by the Memories engine.
Lower Oct (0, -1, -2)
Set how many octaves below the notes you are currently playing will be trigged by the Memories engine.
HAZE
With Haze you can really transform the sound of the Memories. Turn this up to add more. Simple 🙂
Mist
Mist is somewhere between delay and reverb. Use this to achieve a shimmery ambient reverb.
Echo
This is an analogue-inspired tape delay. Use this for adding lots more notes and a sense of rhythm.
Time / Depth / Feedback / Sync
Use these controls to change the sound of the effect. You can temp-sync both Mist and Echo to your DAW’s tempo. Feedback of around 75% or more will start to self-loop if that’s your thing.
PLACES

AMBIENCE
Choose from 6 ambient recordings or real-world spaces. All are subtle enough not to overpower the music, but provide a sense of space.
Power
Turns on / off the Ambience sound.
Level
The volume level of the Ambience.
Pitch
Change the pitch of the Ambience +/- 1 octave.
LP / HP
A gently sloped low and high pass filter.
Send To FX
Using this switch will send the Ambience sound to the effects of Side A on the Process page.
—
NOISE
Choose from 6 analogue noise recordings to add some background texture and mood to your track.
Power
Turns on / off the Noise sound.
Level
The volume level of the Noise.
Pitch
Change the pitch of the Noise +/- 1 octave.
LP / HP
A gently sloped low and high pass filter.
Send To FX
Using this switch will send the Noise sound to the effects of Side A on the Process page.
—
REVERB
Choose from 12 film-location inspired reverb impulses. The small bar on each switch indicates the approximate size of the reverb. Can you guess the movie?
Power
Turns on / off the Reverb effect.
Level
The send level of the Reverb.
Pre-Delay
Add a simulated pre-delay to the front end of the reverb impulse.
—
DELAY
A very powerful and expansive delay effect. Choose from 3 analogue inspired options, a clean and modern digital style or ‘Haze’ which is great for shimmery ambient style reverb. There are plenty of controls to dial in, and they change depending on what style of Delay you have chosen to work with.
Power
Turns on / off the Delay effect.
Level
The overall send/mix level of the Delay.
Sync / Time
Select ‘SYNC’ to time-synchronise the effect to your DAW’s tempo. Then use the Time control to change the beat division that it’s synced with.
PLEASE NOTE This delay uses a healthy dose of CPU to operate. If your CPU is short on power, you may want to leave this effect off and use a simpler external plugin.
PROCESS

The Process page houses all the plugin insert effects. You can choose different effects for each side or decide to operate each one globally.
A/ B
Click on either of the letter to change the controls of that side.
A / A&B
Use the switch in each module to choose whether the settings are specific to that side or you would like them to be for both sides.
MOOD
The MOOD controls on the front page will override all of these controls as soon as you turn on the MOOD power switch. If you want to control these, please turn off the MOOD switch.
ADSR
The ADSR module controls the attack, decay, sustain and release times of the sound. The Attack and Release controls are duplicated on the SOUNDS page.
—
WOW
Wow controls pitch over time. We’ve clamped this so things can’t get too out of hand.
Set to FREE, SIN with a very low Speed and medium Depth will give you a subtle tape wow effect.
—
FLUTTER
The Flutter controls are more expansive and can can be used for anything from giant synth-like pulses and wobbles to fast but subtle tape flutter effects. If you turn the speed to minimum, you can use this Filter as a basic Low Pass filter.
—
Change the level of effects
Think of the Level control on the main Sounds page like an input gain for the effects. You can amplify or reduce their intensities by changing the Level. e.g. Increasing the Level knob will drive the volume going into the Overdrive for an even more distorted sound. Similarly you can work the compressor harder by hitting it with more Level.
GET LOST
The GET LOST option is a randomiser for the whole instrument. Every single parameter will be changed. We have clamped a few items, to ensure you actually get some sound as well as making sure things don’t get too loud.
To access this option, click the GET LOST menu item in the bottom right of the interface.
Click the Random button to randomise all the settings.
Click the Undo button to go back. You can only go back to the previous settings, so don’t expect to keep undoing to what you had set-up an hour ago!
If you only have one side turned on, the Get Lost option will not turn on the other side. If you want both sides to be on and randomised, make sure you have turn them both on first!
